In the world of manufacturing, the art of straightening metal and malleable components is both a skill and a challenge. Skilled technicians can work wonders with basic tools, but even the best craftsmen have their off days. When the straightness of your components directly affects their function and quality, relying solely on human expertise can be risky. Enter the era of semi-automated part straightening, where advanced equipment and real-time measurements transform this art into a precise science.
Manual Straightening
Straightening or flattening metal, or other malleable, bendable components in manufacturing, is often seen as something of an art. A skilled technician, with a good amount of experience and little more than his caliper, hammer and tongs, can convert a bent or warped component back to nearly straight and flat without a second thought.
However, even the most skilled craftsman makes mistakes, gets distracted or tired, and suffers the occasional lapse in judgment. While it may not be a consistent problem, when the function and quality of your components and the assemblies into which they go, is directly dependent on the straightness or flatness of one of its components, the “artist’s touch” may not be consistently good enough. Especially when that “artist” retires or is otherwise absent from the shop.

Semi Automated Straightening
A partially automated part straightening strategy, with highly capable equipment, precise in-process measuring, gauging & computing power, as well as the capability of immediately responding to those measurements, helps elevate the component straightening process from an art to a science.
Step 1: Smart Measuring
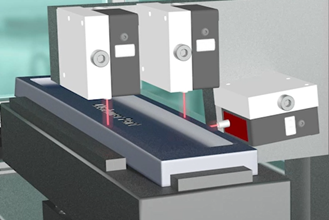
The best straightening strategy starts with the component being measured by multiple laser distance sensors on different axes feeding data to the processor which then computes the amount of press-force needed to straighten the given part.

Step 2: Straightening and Flatten
After measurement takes place, the part is moved into the appropriate pressing position and orientation (guided by an error-proofing systems when operator loading is required) where an electro-mechanical servo press is actuated based on the previously taken measurements. The component can then be moved into additional pressing positions and orientations as needed, guided by the error-proofing system.

Once the component is run through its initial pressing protocol for straightening, it is measured again and re-assessed with the process being repeated as many times as necessary. The average component repeats this process one time.
Step 3: Remove Twist from Part
Additionally, torque may need to be applied to remove any twist within the part. This is best achieved with an associated TorquePRO, which like the press, is indicated to the operator with error-proofing lights. Once placed in position for the TorquePRO, using the measurement data, computes the amount of torque and the angle of motion required to remove any “twist”. The motion is applied and once again, measurement takes place, and the process is repeated as necessary.

The science of straightening parts with the “measure-press/torque-measure strategy” approach gives you the best strategy for ensuring high-quality components and final assemblies which will help guarantee your customers’ satisfaction with your product, and to ensure your long-term success, well-beyond the career-span of any one skilled employee.
There are many straightening strategies available, but Promess provides the most consistently reliable straightening process that gets you the results you need, and delivers to your customer, the results they expect.
Contact us at [email protected] regarding your straightening application!
Learn more about the Straightening Work Station
